




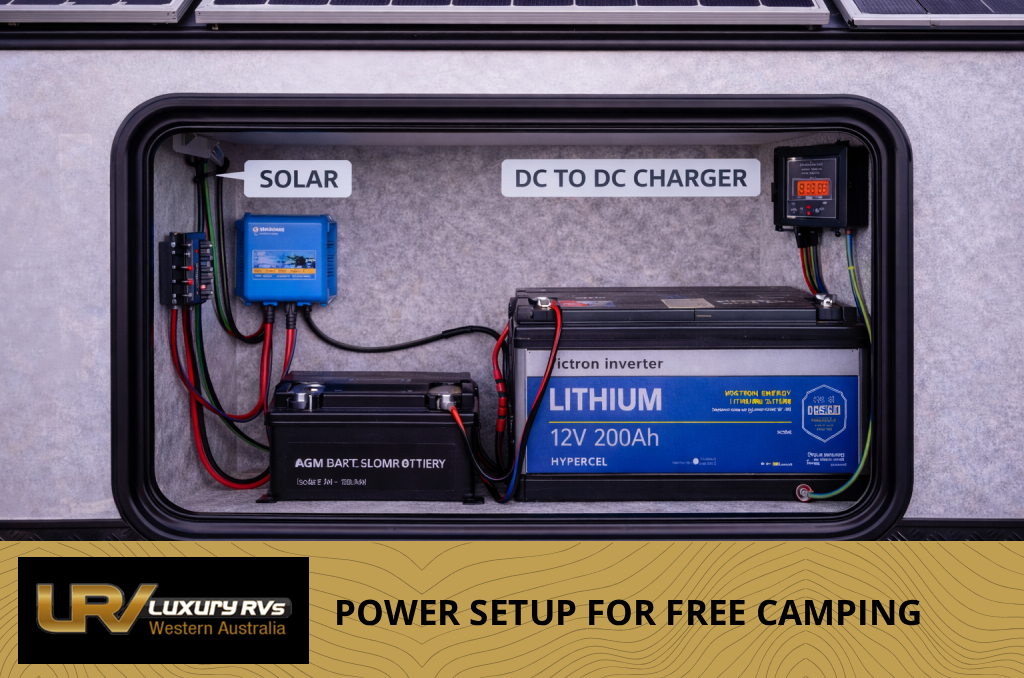
Power Setup for Free Camping

A reliable free camping power setup isn’t about one big upgrade — it’s about how solar, batteries, charging, and usage all work together as a system.

Solar panels mounted on a caravan roof angled toward the sun with a charge controller and cabling visible, showing solar charging for off-grid power.

Free camping gives you freedom — but only if your power setup can support how you actually travel.

Too many caravans are either underpowered, overcomplicated, or built around individual components instead of a complete system. The result is flat batteries, constant compromises, or expensive upgrades that don’t quite deliver.

This guide breaks down a practical power setup for free camping, including:

  • Essential gear
  • Optional upgrades
  • Example configurations for different travel styles

No hype — just real-world setups that work.

The Four Core Parts of Any Free Camping Power System

Every off-grid caravan power setup is built around the same four elements:

  1. Battery storage – where power is stored
  2. Charging sources – how power gets in
  3. Power conversion – how power is used
  4. Monitoring & protection – how the system stays healthy

Miss one, and the system suffers.

1. Battery Storage: The Foundation

Close-up of caravan deep-cycle batteries (lithium or AGM) installed inside a compartment showing battery storage for free-camp power

AGM Batteries

  • Lower upfront cost
  • Heavier
  • ~50% usable capacity

Suitable for:

  • Short trips
  • Occasional free camping
  • Lower power use

Lithium Batteries

  • Higher upfront cost
  • Much lighter
  • 80–100% usable capacity
  • Fast charging

Best for:

  • Regular free camping
  • High power use
  • Long-term touring

Rule of thumb:

If you free camp often, lithium pays for itself in usability.

2. Charging Sources: Keeping Batteries Full

Close-up of caravan deep-cycle batteries (lithium or AGM) installed inside a compartment showing battery storage for free-camp power

Solar (Primary Source)

Common setups:

  • Roof-mounted solar: Set-and-forget
  • Portable panels or blankets: Flexible, shade-friendly
  • Hybrid: Best of both

Solar keeps you off-grid — but only if sized properly.

Vehicle Charging (DC to DC)

A DC to DC charger:

  • Ensures correct charging
  • Works with modern vehicles
  • Is essential for lithium

Battery isolators are no longer suitable for most setups.

240V Mains (When Available)

Used to:

  • Fully top up batteries
  • Balance cells
  • Reduce wearvb

Not part of free camping — but important for system health.

3. Power Conversion: Using the Power

Inverter and DC-to-AC conversion equipment installed inside caravan, illustrating how stored battery power is converted to usable 240 V electricity.

12V Appliances

Always prioritise:

  • 12V fridges
  • LED lighting
  • USB charging

They’re efficient and battery-friendly.

Inverters (240V Power)

Used for:

  • Coffee machines
  • Microwaves
  • Power tools

Common inverter sizes:

  • 1500W: Light use
  • 2000W: Most caravans
  • 3000W: High-demand setups

Inverter size must match battery capacity, not just appliances.

4. Monitoring & Protection: Avoiding Problems

A good system includes:

  • Battery monitor
  • Correct fusing
  • Proper cabling
  • Adequate ventilation

These don’t add glamour — but they prevent failures.

Example Power Setups for Free Camping

Setup 1: Weekend Free Camper

Best for: Short trips, low power use

Typical gear:

  • AGM battery bank
  • 200W roof solar
  • Basic inverter (optional)
  • Simple battery monitor

Setup 2: Regular Free Camper

Best for: Frequent off-grid stays

Typical gear:

  • 100–200Ah lithium battery
  • 300–400W solar (roof + portable)
  • DC to DC charger
  • 2000W inverter
  • Battery monitor

This is the most common “sweet spot” setup.

 Setup 3: Long-Term Off-Grid Touring

Best for: Extended remote travel

Typical gear:

  • 200–400Ah lithium
  • 500W+ solar
  • DC to DC + mains charging
  • 3000W inverter
  • Full monitoring and protection

Built for independence — not compromise.

Common Free Camping Power Mistakes

  • Overspending on batteries but undersizing solar
  • Installing big inverters with small battery banks
  • Ignoring charging limitations
  • Assuming solar works instantly
  • Treating power upgrades as standalone fixes

Systems fail when components aren’t matched.

How to Choose the Right Setup for You

Ask yourself:

  • How many days do I free camp in a row?
  • What appliances do I actually use?
  • Do I travel in shade or sun?
  • Do I want simplicity or flexibility?

The right setup supports your habits — not someone else’s.

Planning a Free Camping Power System?

The best free camping setups are designed as complete systems, not piecemeal upgrades.

If you’re looking at caravans built with proper off-grid power systems — balanced, integrated, and designed for WA conditions — explore the range at Luxury RVs WA or speak with the team about setups that suit how you travel.

Please contact us and start your next adventure today!

Share This :

A reliable free camping power setup isn’t about one big upgrade — it’s about how solar, batteries, charging, and usage all work together as a system.

Solar panels mounted on a caravan roof angled toward the sun with a charge controller and cabling visible, showing solar charging for off-grid power.

Free camping gives you freedom — but only if your power setup can support how you actually travel.

Too many caravans are either underpowered, overcomplicated, or built around individual components instead of a complete system. The result is flat batteries, constant compromises, or expensive upgrades that don’t quite deliver.

This guide breaks down a practical power setup for free camping, including:

  • Essential gear
  • Optional upgrades
  • Example configurations for different travel styles

No hype — just real-world setups that work.

The Four Core Parts of Any Free Camping Power System

Every off-grid caravan power setup is built around the same four elements:

  1. Battery storage – where power is stored
  2. Charging sources – how power gets in
  3. Power conversion – how power is used
  4. Monitoring & protection – how the system stays healthy

Miss one, and the system suffers.

1. Battery Storage: The Foundation

Close-up of caravan deep-cycle batteries (lithium or AGM) installed inside a compartment showing battery storage for free-camp power

AGM Batteries

  • Lower upfront cost
  • Heavier
  • ~50% usable capacity

Suitable for:

  • Short trips
  • Occasional free camping
  • Lower power use

Lithium Batteries

  • Higher upfront cost
  • Much lighter
  • 80–100% usable capacity
  • Fast charging

Best for:

  • Regular free camping
  • High power use
  • Long-term touring

Rule of thumb:

If you free camp often, lithium pays for itself in usability.

2. Charging Sources: Keeping Batteries Full

Close-up of caravan deep-cycle batteries (lithium or AGM) installed inside a compartment showing battery storage for free-camp power

Solar (Primary Source)

Common setups:

  • Roof-mounted solar: Set-and-forget
  • Portable panels or blankets: Flexible, shade-friendly
  • Hybrid: Best of both

Solar keeps you off-grid — but only if sized properly.

Vehicle Charging (DC to DC)

A DC to DC charger:

  • Ensures correct charging
  • Works with modern vehicles
  • Is essential for lithium

Battery isolators are no longer suitable for most setups.

240V Mains (When Available)

Used to:

  • Fully top up batteries
  • Balance cells
  • Reduce wearvb

Not part of free camping — but important for system health.

3. Power Conversion: Using the Power

Inverter and DC-to-AC conversion equipment installed inside caravan, illustrating how stored battery power is converted to usable 240 V electricity.

12V Appliances

Always prioritise:

  • 12V fridges
  • LED lighting
  • USB charging

They’re efficient and battery-friendly.

Inverters (240V Power)

Used for:

  • Coffee machines
  • Microwaves
  • Power tools

Common inverter sizes:

  • 1500W: Light use
  • 2000W: Most caravans
  • 3000W: High-demand setups

Inverter size must match battery capacity, not just appliances.

4. Monitoring & Protection: Avoiding Problems

A good system includes:

  • Battery monitor
  • Correct fusing
  • Proper cabling
  • Adequate ventilation

These don’t add glamour — but they prevent failures.

Example Power Setups for Free Camping

Setup 1: Weekend Free Camper

Best for: Short trips, low power use

Typical gear:

  • AGM battery bank
  • 200W roof solar
  • Basic inverter (optional)
  • Simple battery monitor

Setup 2: Regular Free Camper

Best for: Frequent off-grid stays

Typical gear:

  • 100–200Ah lithium battery
  • 300–400W solar (roof + portable)
  • DC to DC charger
  • 2000W inverter
  • Battery monitor

This is the most common “sweet spot” setup.

 Setup 3: Long-Term Off-Grid Touring

Best for: Extended remote travel

Typical gear:

  • 200–400Ah lithium
  • 500W+ solar
  • DC to DC + mains charging
  • 3000W inverter
  • Full monitoring and protection

Built for independence — not compromise.

Common Free Camping Power Mistakes

  • Overspending on batteries but undersizing solar
  • Installing big inverters with small battery banks
  • Ignoring charging limitations
  • Assuming solar works instantly
  • Treating power upgrades as standalone fixes

Systems fail when components aren’t matched.

How to Choose the Right Setup for You

Ask yourself:

  • How many days do I free camp in a row?
  • What appliances do I actually use?
  • Do I travel in shade or sun?
  • Do I want simplicity or flexibility?

The right setup supports your habits — not someone else’s.

Planning a Free Camping Power System?

The best free camping setups are designed as complete systems, not piecemeal upgrades.

If you’re looking at caravans built with proper off-grid power systems — balanced, integrated, and designed for WA conditions — explore the range at Luxury RVs WA or speak with the team about setups that suit how you travel.

Please contact us and start your next adventure today!

Share This :

Create your own custom motorcycle masterpiece!